When I first started exploring advanced 3D printing workflows, I realized that the slicer software plays a far more important role than the printer itself. Orca Slicer is one of those tools that quietly transforms raw 3D models into highly optimized instructions that a printer can follow with precision. In this article, I will explain how Orca Slicer works, what makes it valuable for hobbyists and professionals, and how users can extract maximum performance from it. Rather than repeating generic information, I will provide a structured and detailed explanation of features, configuration strategies, performance settings, and optimization techniques that make this slicer powerful and practical.
What Is Orca Slicer and Why It Matters
Orca Slicer is a 3D printing slicing application that converts digital 3D models into machine readable code, commonly referred to as G code. This code instructs the printer where to move, how much filament to extrude, and how to construct each layer of a model.
The importance of a slicer cannot be overstated because it directly affects print quality, speed, material efficiency, and mechanical strength. Even the most advanced 3D printer cannot produce high quality results if the slicing configuration is poorly tuned. Orca Slicer bridges the gap between creative design and physical production by offering advanced tools for precise control.
The Core Function of Slicing Software
To better understand Orca Slicer, it helps to understand the slicing process itself. A 3D model, usually in STL or 3MF format, is composed of geometric surfaces. These surfaces describe the shape of the object but do not contain instructions for printing. Orca Slicer analyzes the geometry and divides it into thin horizontal layers. For each layer, it calculates:
- Perimeter paths
- Infill patterns
- Support structures
- Extrusion speeds
- Retraction movements
- Cooling instructions
These calculations create a roadmap for the printer to follow from the first layer to the final surface.
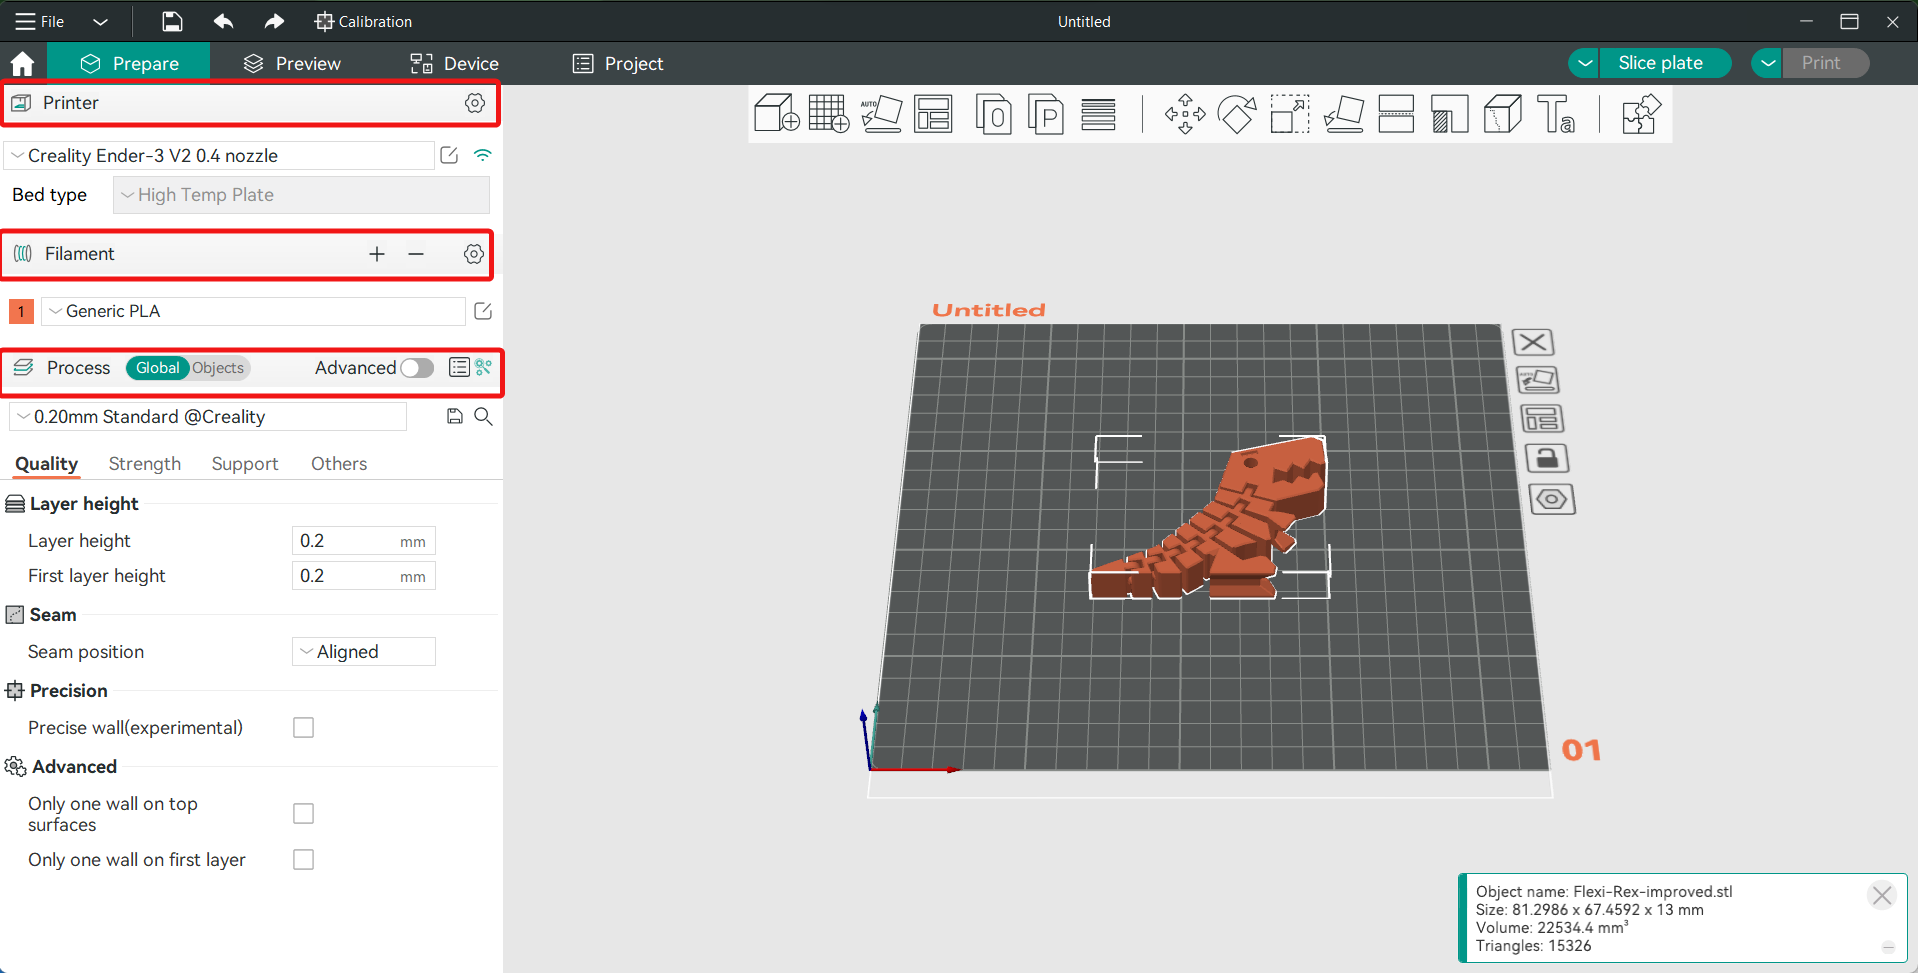
User Interface and Workflow Structure
A well designed interface improves productivity and reduces mistakes. Orca Slicer offers an organized layout that supports both beginners and advanced users.
Workspace Overview
The main workspace typically includes:
- A 3D model preview area
- Configuration panels
- Printer profile settings
- Material profile adjustments
- Layer preview mode
The preview window allows users to rotate, zoom, and inspect models before slicing. This step is crucial for detecting errors such as non manifold geometry or scaling issues.
Basic Workflow Steps
The typical Orca Slicer workflow can be summarized in the following table:
| Step | Action | Purpose |
|---|---|---|
| 1 | Import 3D model | Load design file into workspace |
| 2 | Choose printer profile | Match slicing settings to hardware |
| 3 | Select material profile | Adjust temperature and extrusion parameters |
| 4 | Configure print settings | Control quality, speed, and supports |
| 5 | Slice model | Generate G code instructions |
| 6 | Preview layers | Inspect toolpaths and structural details |
| 7 | Export file | Transfer to printer |
This structured workflow ensures consistency and repeatable results.
Printer Profiles and Customization
Printer profiles define the mechanical characteristics of a specific 3D printer. Orca Slicer allows users to either choose preconfigured profiles or create custom ones.
Why Profiles Matter
Every printer differs in terms of:
- Nozzle diameter
- Build volume
- Motion system type
- Maximum speed
- Acceleration limits
If these parameters are incorrect, prints may suffer from dimensional inaccuracies or mechanical failures. Orca Slicer ensures that each print matches the physical capabilities of the hardware.
Creating a Custom Printer Profile
Advanced users often create custom profiles to fine tune performance. Important parameters include:
- Bed size and shape
- Maximum extrusion rate
- Retraction distance
- Firmware compatibility
Proper calibration improves both speed and surface quality.
Material Profiles and Temperature Control
Material selection has a major impact on slicing strategy. Different filaments behave differently under heat and stress.
Common Filament Types
| Material | Strength | Ease of Printing | Typical Temperature Range |
|---|---|---|---|
| PLA | Moderate | Very Easy | 180 to 220 degrees C |
| PETG | Strong | Moderate | 220 to 250 degrees C |
| ABS | Durable | Advanced | 230 to 260 degrees C |
| TPU | Flexible | Advanced | 210 to 240 degrees C |
Orca Slicer allows users to assign material profiles that automatically adjust:
- Nozzle temperature
- Bed temperature
- Cooling fan speed
- Retraction settings
These parameters ensure that the filament bonds correctly without warping or stringing.
Print Quality Settings and Layer Height
Layer height determines how thick each printed layer will be. Smaller layer heights produce smoother surfaces but increase print time.
Quality Versus Speed
The relationship between layer height and print time can be illustrated below:
| Layer Height | Surface Finish | Print Time | Ideal Use Case |
|---|---|---|---|
| 0.08 mm | Very Smooth | Long | Display models |
| 0.2 mm | Balanced | Moderate | General prints |
| 0.3 mm | Rougher | Short | Functional prototypes |
Orca Slicer allows dynamic layer adjustments so users can vary layer height across different sections of a print. This technique reduces time while preserving detail where necessary.
Infill Patterns and Structural Strength
Infill determines the internal structure of a printed object. Orca Slicer provides multiple pattern options.
Popular Infill Types
- Grid
- Gyroid
- Honeycomb
- Cubic
- Triangle
Each pattern influences strength and material usage differently.
| Infill Pattern | Strength Distribution | Material Usage | Print Speed |
|---|---|---|---|
| Grid | Even | Moderate | Fast |
| Gyroid | Isotropic | Moderate | Moderate |
| Honeycomb | Strong | Higher | Slower |
| Cubic | Balanced | Moderate | Moderate |
Choosing the right infill depends on whether the object is decorative or functional.
Support Structures and Overhang Management
Some models contain overhangs that require temporary support. Orca Slicer calculates support placement automatically but allows manual adjustment.
Support Configuration Options
Users can modify:
- Support density
- Contact distance
- Placement type
- Support angle threshold
Well configured supports prevent sagging while remaining easy to remove after printing.
Speed and Acceleration Control
Print speed impacts both efficiency and quality. Orca Slicer enables separate speed settings for:
- Perimeters
- Infill
- Travel moves
- First layer
Balancing these speeds prevents defects such as ringing or layer shifting.
Acceleration and Jerk Settings
Acceleration settings determine how quickly the printer changes speed. Excessively high acceleration may cause vibration. Lower values improve surface finish but extend print duration.
Retraction and Stringing Prevention
Retraction pulls filament back during travel moves to prevent unwanted oozing. Orca Slicer allows precise tuning of:
- Retraction distance
- Retraction speed
- Minimum travel distance
Proper tuning reduces stringing between model parts.
Cooling and Thermal Management
Cooling fans influence layer adhesion and bridging performance. Orca Slicer provides adjustable fan curves.
Cooling Strategy
For example:
- First layer: minimal cooling for strong adhesion
- Small features: higher cooling for sharp details
- Bridges: increased cooling for structural integrity
Careful thermal management reduces warping and improves detail clarity.
Advanced Features and Optimization Tools
Orca Slicer includes advanced capabilities for experienced users.
Variable Layer Height
This feature dynamically adjusts layer thickness based on model curvature, preserving detail while reducing time.
Pressure Advance and Flow Calibration
Flow calibration ensures consistent extrusion volume. Pressure advance compensates for extrusion lag during speed changes.
Multi Material Printing
When using multi extruder printers, Orca Slicer supports:
- Color transitions
- Material switching
- Prime towers
These features enable complex designs without manual intervention.
File Formats and Compatibility
Orca Slicer commonly supports:
- STL
- 3MF
- OBJ
Exported G code must match the firmware of the printer, such as Marlin or Klipper based systems. Compatibility ensures reliable execution.
Common Mistakes and How to Avoid Them
Even with powerful software, user mistakes can affect results.
Incorrect Bed Adhesion
Solutions include:
- Increasing first layer temperature
- Adjusting bed leveling
- Slowing initial print speed
Over Extrusion
If filament flow is too high, surfaces may bulge. Calibration of extrusion multiplier resolves this issue.
Under Extrusion
Thin layers or gaps may indicate clogged nozzles or low flow rate settings.
Performance Comparison Framework
Below is a structured view of how different configuration areas influence final output:
| Setting Category | Impacts Surface Quality | Impacts Strength | Impacts Time |
|---|---|---|---|
| Layer Height | High | Medium | High |
| Infill Density | Low | High | Medium |
| Print Speed | Medium | Medium | High |
| Cooling | High | Medium | Low |
| Retraction | Medium | Low | Low |
Understanding these relationships allows users to prioritize what matters most for a specific project.
Practical Optimization Strategy
When I adjust Orca Slicer settings, I follow a systematic approach:
- Start with a stable printer profile
- Select the correct material preset
- Adjust layer height for intended use
- Choose appropriate infill percentage
- Test small calibration prints
- Refine temperature and speed settings
This structured method reduces trial and error.
Benefits of Using Orca Slicer
Orca Slicer offers:
- High customization flexibility
- Strong preview visualization
- Layer by layer inspection
- Efficient slicing algorithms
- Material optimization tools
These advantages empower users to refine prints with precision.
Long Term Workflow Improvements
As users gain experience, they often create dedicated profiles for specific projects such as:
- Miniature models
- Mechanical components
- Large structural parts
- Flexible prototypes
Saving these presets ensures consistent and repeatable results across multiple prints.
Future Potential of Slicing Software
Slicing software continues to evolve with features like:
- Artificial intelligence driven optimization
- Real time printer feedback integration
- Cloud based slicing
- Automated calibration routines
Orca Slicer is positioned within this innovation trend by focusing on advanced configurability and efficiency.
Conclusion
From my perspective, Orca Slicer represents a powerful and adaptable slicing solution that gives users deep control over the 3D printing process. It transforms simple digital models into optimized, efficient printing instructions that balance speed, strength, and quality. By understanding printer profiles, material behavior, infill structures, and advanced calibration settings, users can achieve highly refined results. Success with Orca Slicer comes from experimentation, structured testing, and a clear understanding of how each setting influences the final product. When approached thoughtfully, it becomes not just a tool but a central component of a reliable and professional 3D printing workflow.
Read: CXX Programming Explained: Concepts and Uses
FAQs
What is Orca Slicer mainly used for?
Orca Slicer converts 3D model files into G code instructions that guide 3D printers during the printing process.
Is Orca Slicer suitable for beginners?
Yes, it offers default profiles and structured settings that help beginners while still supporting advanced customization.
Can I use Orca Slicer for multi material printing?
Yes, it supports multi extruder configurations and material switching features when compatible hardware is available.
How does layer height affect print quality?
Smaller layer heights produce smoother surfaces but increase print time, while larger layers print faster with reduced detail.
Why is preview mode important in Orca Slicer?
Preview mode allows users to inspect toolpaths, detect errors, and verify supports before starting the print.